Selenium IDE part 2
In part 1 , we have learnt about installation of Selenium IDE, details of its features and menus etc. In Selenium IDE part 2, we will see how to create test case and Suite , recording and run etc.
Let’s start with the 3rd point of the Selenium IDE tutorial.
3. Create New Test Case:
Open the Selenium IDE (To open go to Tools in Firefox –> Selenium IDE).
Let’s use www.gmail .com as an application for which we will create he test case.
Steps to record:
- Open Selenium IDE
- Go to Firefox and type www.gmail.com in address bar of the browser
- Click on Sign In link
- Provide your Username
- Provide your password
- Click on Sign In button
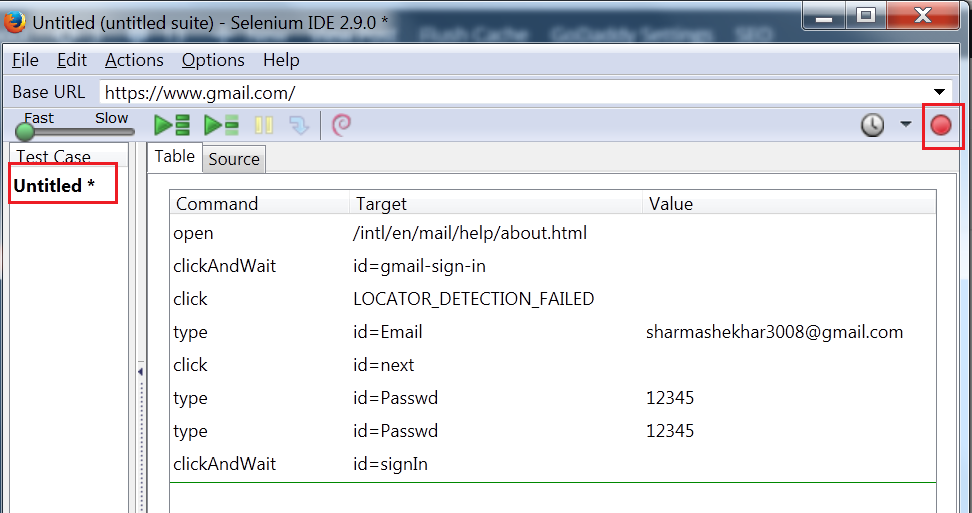
After recording steps , you can click on the recording button to stop the recording as highlighted in the figure below.
At the first instance, recorded test case will not have any name. You can change the name of the test case( as shown in the part 1). We have given the name Gmail to the test case.
You can see all the recorded steps , in the table view of script editor. For replaying the steps, go to “Actions –> Play Current Test case”.
You can see the browser repeating the same steps which you have recorded.
4. Create a Test Suite:
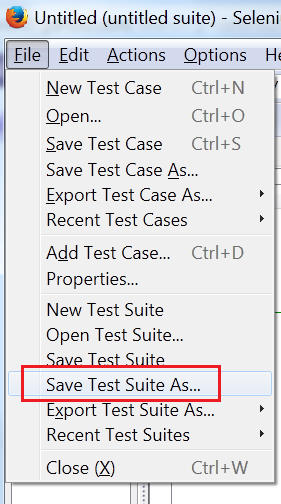
You can add more test cases to the current test in the Test Pane. How to add more test cases? Explained in part 1. We have added a new test case and recorded few steps on yahoo.com.We have given the name to this test as Yahoo. Now, To save it as a suite we need to go to “File –> Save Test Suite As..” and given some name to suite and save it.
Another way to create the suite is , before starting go to “File –> New Test Suite..” and then keep adding test cases into that.
5. Commonly used methods in Selenium IDE:
We will see few commonly used methods in selenium IDE.
| Command | Description |
| open | Opens a specified URL in the browser. |
| assertElementPresent, verifyElementPresent | Verify / Asserts the presence of an element on a web page. |
| assertTitle, VerifyTitle | Returns the current page title and compares it with the specified title |
| type, typeKeys, sendKeys | Enters a value (String) in the specified web element. |
| Click, clickAt, clickAndWait | Clicks on a specified web element within a web page. |
| waitForPageToLoad | Sleeps the execution and waits until the page is loaded completely. |
| chooseOkOnNextConfirmation, chooseCancelOnNextConfirmation | Click on ”OK” or “Cancel” button when next confirmation box appears.. |
| waitForElementPresent | Sleeps the execution and waits until the specified element is present. |
6. Assertions:
Assertions are used to verify the expected value with the actual value. As a result we get boolean value like false/true.
There are mainly 3 types of Assertions.
- Assert: Assert verifies the expected value with actual value. If fails, execution will be stopped.
- Verify: Verify verifies the expected value with actual value. If fails, execution will not be stopped but failed will be reported and continue execution.
- waitFor: the “waitFor” command waits for a certain condition to be met before executing the next test step. The conditions are like page to be loaded, element to be present.
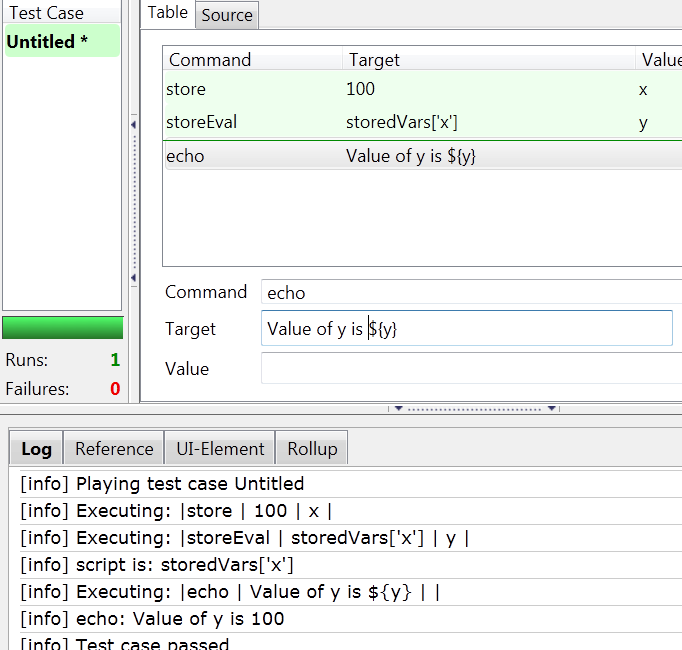
7. Echo, StoreEval and StoredVars in Selenium IDE:
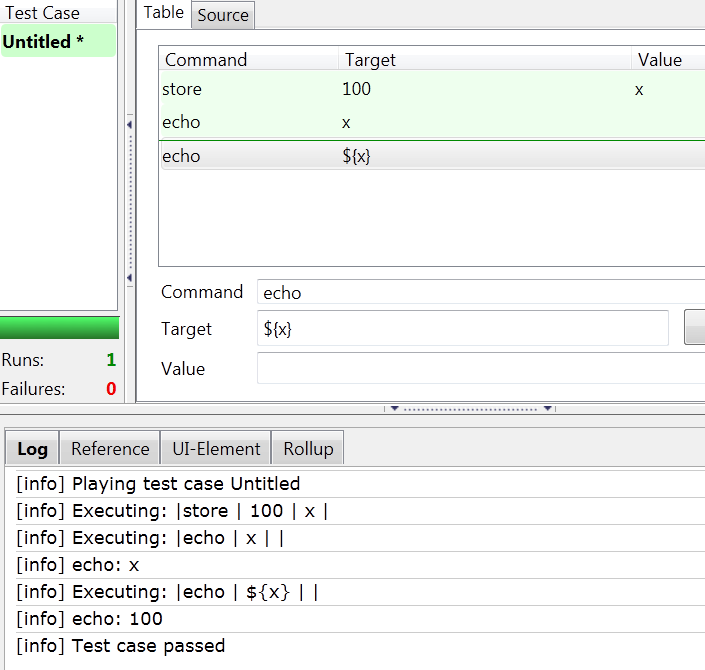
Store: It is used to declare and assign any value to a variable.
e.g.
Command: store
Target: 100
Value: x
This will store value 100 into variable x.
Echo: This is used to print the value of any variable.
e.g.
Command: echo
Target: x
Value:
To print the value of a variable you have to write in curly braces like shown below.
Syntax : ${variable}
Command: echo
Target: ${x}
Value:
You can refer the below figure for more understanding.
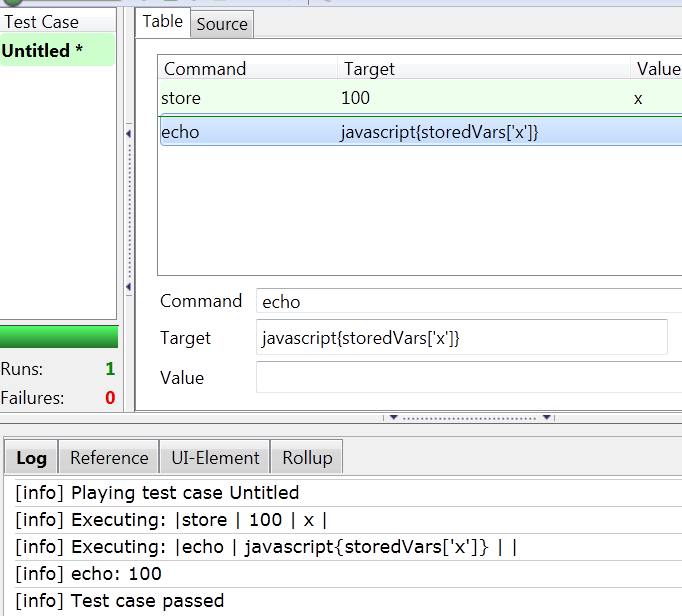
StoredVars: StoredVars is nothing but an array which stores all the declared variables by default.To access the value from this ,you have to write like below.
Syntax: javascript{storedVars[‘variable’]}
Command: echo
Target: javascript{storedVars[‘x’]}
Value:
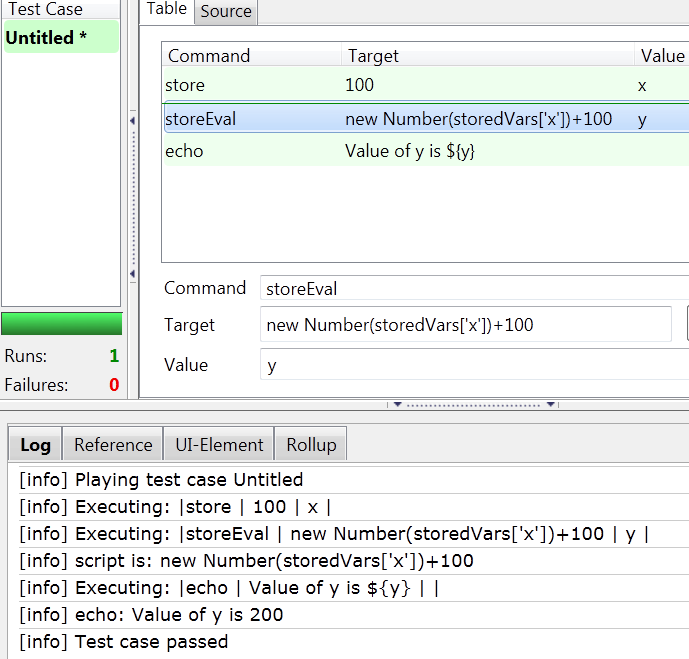
storeEval: This command helps to assign and print value of a variable without help of javascript{}.
Command: storeEval
Target: storedVars[‘x’]
Value:y
We are directly assigning the value of x to variable y. Look at the below screen.
How to add a value(e.g. 100) to variable x and store it in another variable y?
Command: storeEval
Target: storedVars[‘x’]+100
Value:y
Output will be printed as 100100.
Because it treats returned value of storedVars[‘x] as string.To avoid that, we have to type cast with Number.
Command: storeEval
Target: new Number(storedVars[‘x’])+100
Value:y
7. User Extension:
User Extensions are java script files which allow user to write customized javascript functions which can be used in selenium IDE in the same we use store, storeEval etc.
It might be available to download from gitHub, BigBucket ,google group etc. Right now, it is available in gitHub, I am giving the link for that (Download location might change in future).
It is not mandatory to give it the name as user Extension , but recommended.
After downloading file, you can attach the file by going to “Options –> options”. In the general tab, you need to browse the file into “Selenium core Extension”.
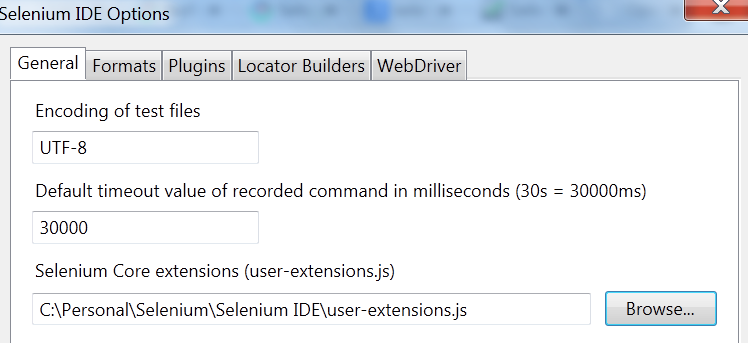
Multiple extensions can be added that will be separated by comma.
9. Writing a simple program in javascript and use that in Selenium IDE:
We will see how to write a program in user-extensions and use it in Selenium IDE. Let’s add a simple example which will check the target value. If target value is greater than 10 , then is a valid number else not valid. It will give a alert box with a message.
Selenium.prototype.doValidateNum = function(num)
{
	if(num>10){
	    alert("Number is valid");
    }else{
	    alert("Number is not valid");
	}

}
Another important point to note is that when we write a function, selenium IDE add one more function by appending the keyword ‘andWait’. Refer the below screen for understanding.

Now, give the below command and run the test to check the output is coming correctly or not.
Command: validateNum
Target: 20
Value:y
Expected output : An alert box with message “Number is valid”.

1 Response
[…] we will discuss about installation of Selenium IDE , its features and menus in detail. In next part 2, we will see how to create test case, test suite, commonly used methods […]