Object identification using xpath in Selenium
In the previous post , we have seen how to identify the objects with different types of locator? In this post, we will learn Object identification using xpath in Selenium.
When there is no unique properties like id, name,class etc., then the best solution is to go for XPATH or CSS Selectors.In this post, we will learn how to use Xpath for object identification and in the next post we will see how to use CSS selectors.
XPATH , XML path language, is used to identify the web elements in the webpage.XML stands for Extensible Markup Language, which stores the data in key and value pair which is very similar to HTML.As both are mark up language and come under the same roof, XPATH can also be used to locate the element under the HTML.
XPATH provides the address or path of an element in the HTML document after traversing through all the required nodes. Sometimes , it requires to make a reference of neighbor elements to identify the desired element.
Now there are tools like Firebug and Firepath which can create XPATH for you and you can also create XPATH. Let’s learn how to customize XPATH with some example.
There are 2 types of XPATH.
- Absolute XPATH
- Relative XPATH
To understand the concept of XPATH, we have created a simple demo application.Below is the code for that. Copy this code into a notepad and save it with extension ‘.html’.
<!DOCTYPE html>
<html>
<body>
  <input type="text" name="firstname" placeholder="First Name">
  <input type="text" name="lastname" placeholder="Last Name">
  <input type="submit">
</body>
</html>
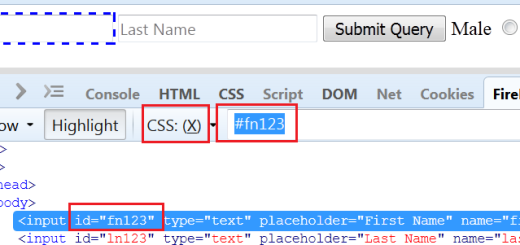
Open the file with a browser, it will look like as shown below in figure 1.0.Therr are 2 edit boxes as ‘First Name’ and ‘Last Name’ along with a ‘Submit’ button.

Fig 1.0
What is Absolute XPATH?
Absolute XPATH is the full path of any element that starts getting built from the root node of the document. Suppose in our application , we need to create the absolute xpath for Last Name edit box.
So , we can start with root node which is ‘html’ and then traverse up to the ‘Last Name’ node.
As we can see under html tag , there are 2 tags which are ‘head’ and ‘body’. ‘Last name’ has tag name as input which comes under ‘body’ tag.
e.g. Step 1: html/body
As ‘Last name’ comes at the second position under body tag.So ,Input tag will take number 2 enclosed with a square bracket. Final XPATH will be as shown below.
Step 2: html/body/input[2]
One disadvantage of using absolute xpath is that if any thing changes in the document (some tags are added or removed), XPATH will not work in that case.
As an example, suppose there is a edit box for middle name added between first name and last name. Then xpath html/body/input[2] will start pointing to the middle name instead of last name. So, the result will not be the expected one.
What is relative path?
A relative path can be developed from the any middle point in the document and it start with double slash(//). It can contain more than one pair of properties and values separated by AND.
Basic Syntax of Relative XPATH:
//tagname[@property1=’val1′ and @property2=’Val2′]
If we take the same example as mentioned above, then relative xpath can be written something like this.
e.g. //input[@name=’lastname’]
It will solve the above issue as well, that means if middle name is added , this relative xpath will be able to identify the ‘Last Name’ successfully.Because it will search for the input tag in the document which is having name as ‘lastname‘.
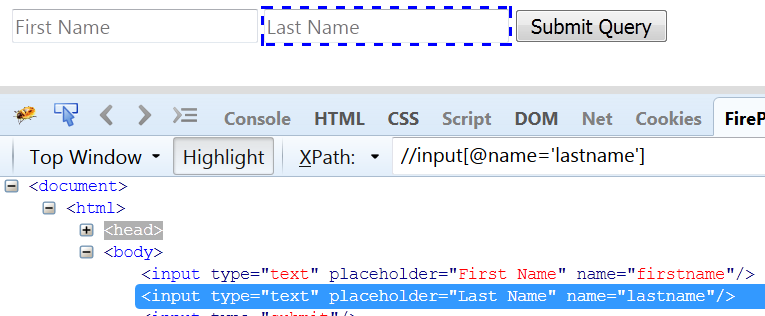
Fig 1.1
Going forward , we will see the ways to customize relative xpath which is mostly used in practical scenarios.
How to write if we have multiple properties?
You can write multiple properties and values separated by AND operator.Consider the above example.
Develop XPATH using last(): This is used to select last node of any specific type in the document or under its parent node.Let’s see how to use it.
| XPATH | Description |
| html/body/input[last()] | It will select the last input tag which is a submit button in our application. |
| //input[last()] | This will select the last input tag in each of the parent node. |
| //input[last()-1] | If we subtract 1 from last(), it will select previous one from the last input tag in each parent node. Which is last name in out case. |
Just to show you the usage of last(), we have added radio button for Male and Female selection.Now, if execute this xpath //input[last()].Let’s how the output will be.
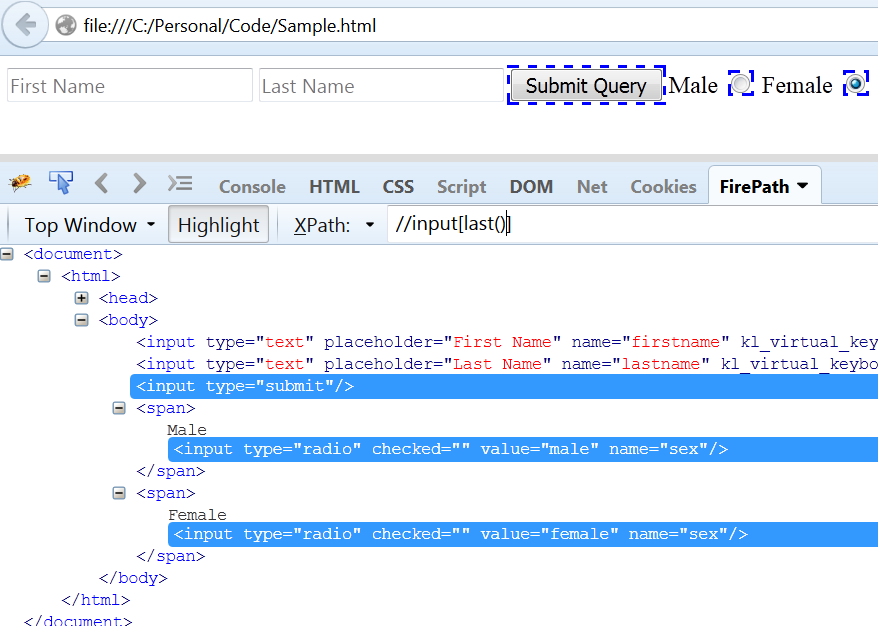
Fig 1.2
<!DOCTYPE html>
<html>
<body>
  <input type="text" name="first1234" placeholder="First Name">
  <input type="text" name="lastname" placeholder="Last Name">
  <input type="submit">
  <span>Male
  <input type="radio" name="sex" value="male" checked>
  </span>
  <span>Female
  <input type="radio" name="sex" value="female" checked>
  </span>
</body>
</html>
Usage of count function: By using count function, you can count the total no. of specific tag in the HTML document. As we have total 5 input tags, it shows the count as 5.
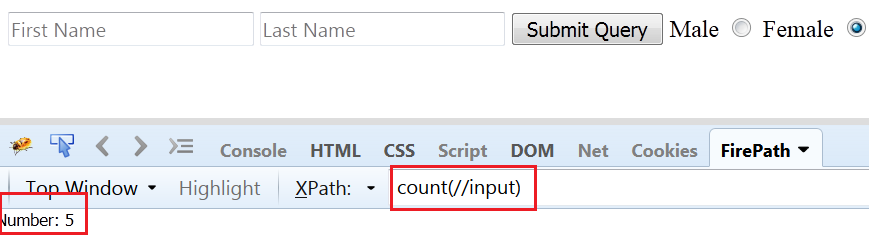
Fig 1.3
Usage of position Function: Select the node on the basis of the position or index relative to all nodes. Look at the below example for understanding.
We are selecting input tag under span tag.
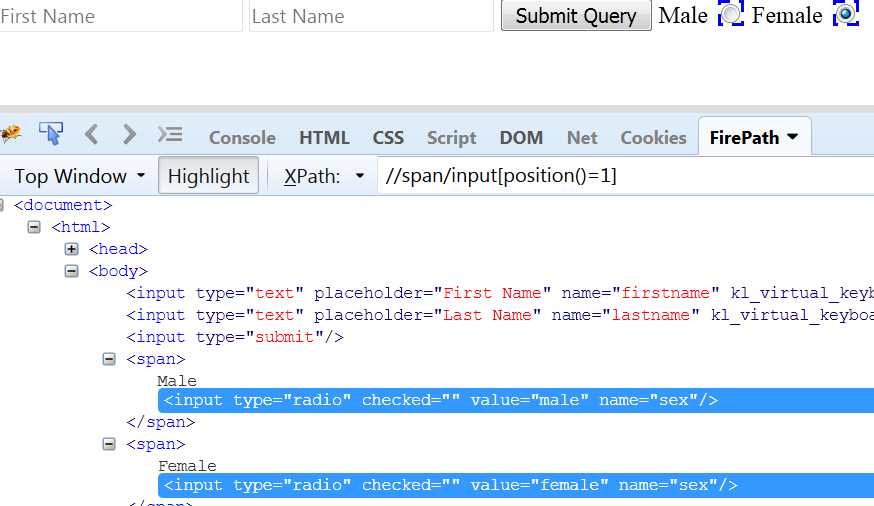
Fig 1.4
Develop XPATH using contains keyword: The contains keyword finds the specified value in the whole property value. If it finds, it will return the matching node otherwise says no match found.
It might be useful if we have any property value which is dynamically changing. Take an example of First name edit box, suppose its name property value having some numeric value added in the end which can be changed in next execution (Refer the fig 1.5). In that case, we can use contains.
Syntax:
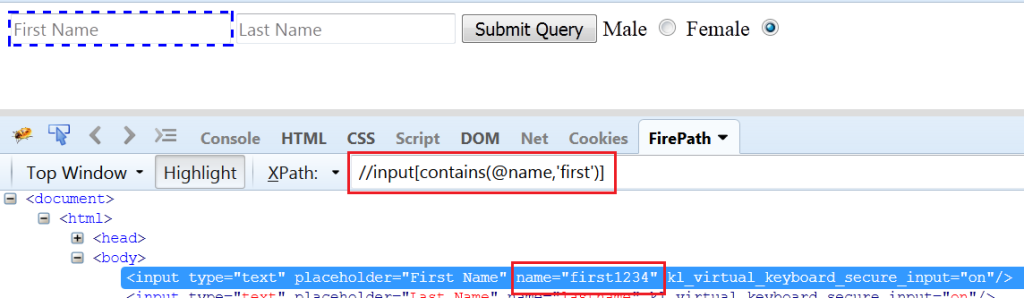
Fig 1.5
Develop XPATH using starts-with Keyword:
We can take the above example again , where we can verify if name property start with the value “first” or not. If true, returns matching node else match not found.
Syntax:
Develop XPATH using ends-with keyword: The keyword ends-with does not support Xpath 1.0, rather it has been included from Xpath 2.0. If your browser does not support Xpath 2.0, below expression will not work.
But we have its alternative as given next using substring function.
Develop xpath using substring function: We can use the substring function in the way, the ends-with would have worked. Look at the below syntax for understanding where it is verifying if last 4 characters in the string ends with ‘1234’.
We have also used string-length function to calculate the length of the string (“firstname1234).

Fig 1.6
Xpath Axes:
XPATH axes can be useful for navigating through the hierarchical node tree of the document e.g. for selecting parent node, child node, sibling node etc.
| Axes Name | Description |
| child | Select the children of the current node. |
| attribute | Select attribute of the current node. |
| ancestor | Selects all ancestors of the current node e.g parent, grandparent, etc. |
| ancestor-or-self | Selects all ancestors of the current node e.g parent, grandparent, etc. or current node itself. |
| descendant | Selects all descendant of the current node e.g children, grandchildren, etc. |
| descendant-or-self | Selects all descendant of the current node e.g children, grandchildren, etc. or current node itself. |
| following | Selects all nodes of specified type in the document after the closing tag of the current node |
| following-sibling | Selects specified sibling after the current node. |
| following-sibling | Selects all namespace nodes of the current node. |
| preceding | Selects all nodes which occur before the context node, in document order. |
| preceding-sibling | selects the preceding siblings of the context node |
| parent | selects the parent of the context node if exits. |
| self | Selects the current node. |
Example of Xpath Axes:
child Axes:
If we want to select the radio button for Male, then Xpath will be used as follows:
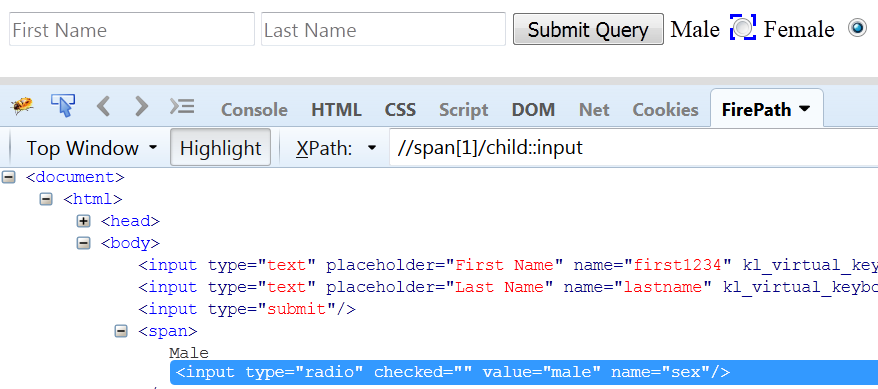
Fig 1.7
attribute Axes: This will select the specified attribute of the current node. If we want to select the name attribute of the last name, then XPath would be formed as shown below.
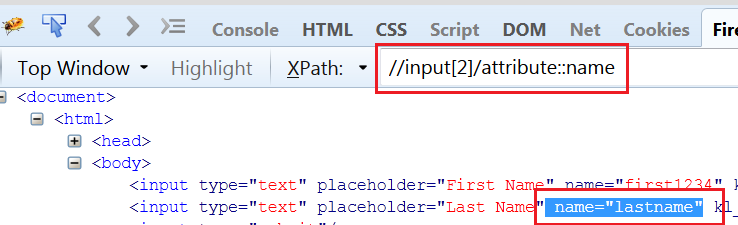
Fig 1.8
following Axes: It will select all node of a specific type in the whole document after the current node.
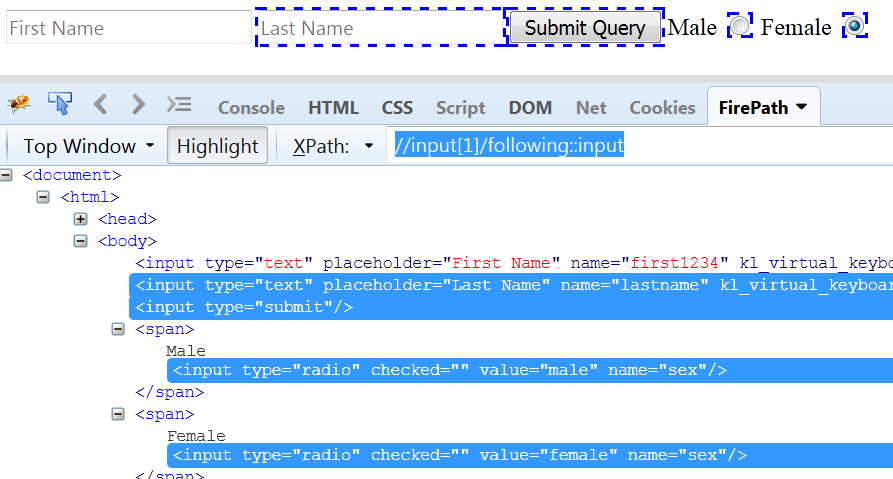
Fig 1.8
following-sibling Axes: It will select the next all siblings after the current node. In above example, if we replace following with following-sibling, then observe the difference.
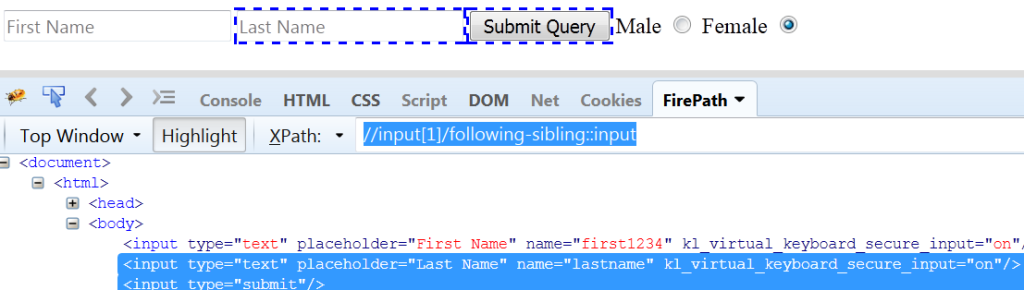
Fig 1.9
Parent Axes: It is used to select the parent node of the current node. Suppose, we want to select the Span tag of radio button ‘Male’. Then xpath would be formed as.
Preceding Axes: It is used to select the previous node of any current node. Suppose, on the basis of last name node , we want to select the first name. Then Xpath would be formed as.
Self Axes: The current node will select itself.In the below xpath, last name would be selected.
How to use chrome to inspect elements and finding XPATH or CSS?
Open chrome, eitther press F12 or go to ‘More tools– > Developer tool’.
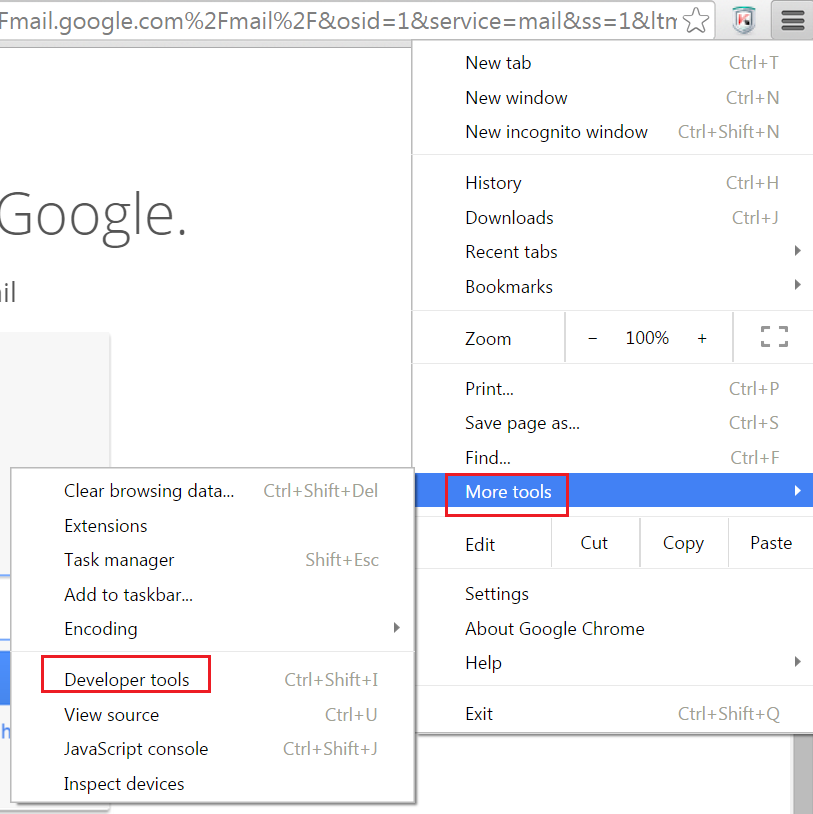
Fig 1.10
There is another way to open developer tools. Suppose, we want to inspect username of Gmail. Then right click on Username and select option ‘Inspect element’. It will directly open the developer tool and show you the inspected element as well.
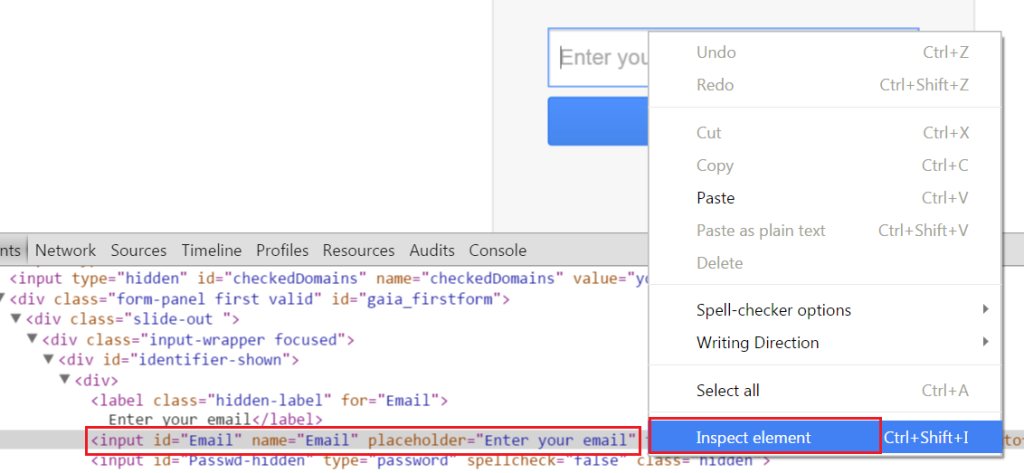
Fig 1.11
To get the XPATH or CSS , we can directly right click on the inspected element and copy the XPATH or CSS which ever is required.
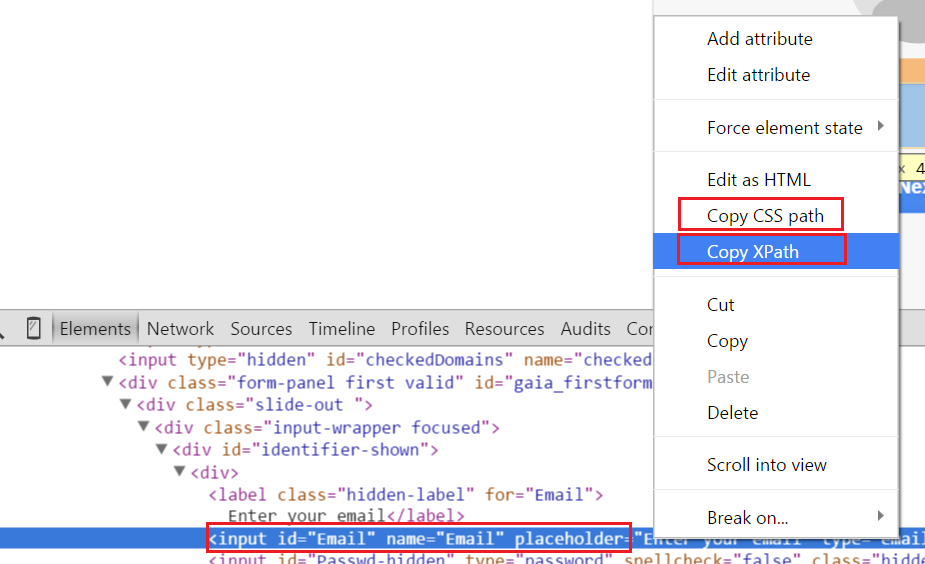
Fig 1.12

1 Response
[…] the previous post, we have seen how to locate elements in HTML document using XPATH. In this post, we will see how to locate elements or objects using […]